
2025 – The NYUAD Engineers for Social Impact program works develop a broad range of analytical and systematic thinking skills in students as they work with communities and consider the home-grown assets that can lead to innovation.
A group of NYUAD Engineering students worked with urbz in Mumbai on new designs for pavements and drainage within the Dharavi Koliwada community.
Mapping Dense Urban Areas
Adit Chopra
Introduction
This guide covers the use of GPS loggers and related Georeferencing Software for accurately recording and mapping trails, and outdoor routes with necessary precautions and warnings to ensure high-quality data. GPS logging is essential for:
- Creating detailed trail and street maps
- Recording building locations and infrastructure
- Documenting elevation changes and terrain features
- Contributing to open mapping projects
- Preserving local geographic knowledge
Essential Terminology
Geographic Mapping
A scientific process which involves observing, recording and analyzing surroundings to create maps which display critical information ranging from urban features like buildings, roads and intersections to geological information such as rock distribution, elevation profiles, etc.
(Note: For the sake of this project, we are only mapping dense urban areas like Dharavi Koliwada which lack a comprehensive digital mapping coverage.)
Geologgers
A device or application that records your geographic location at regular intervals as you move through space. GPS loggers create a continuous "track" or "trace" of your traveled route by collecting waypoints that include:
Data Collected:
- Latitude and longitude coordinates (horizontal position)
- Elevation data (height above sea level)
- Timestamp information (date and time of recording)
- Speed and bearing (optional, in some devices)
Common Devices:
- Dedicated GPS units (Garmin, Suunto)
- Smartphone applications (BasicAirData, OSMTracker)
Georeferencing
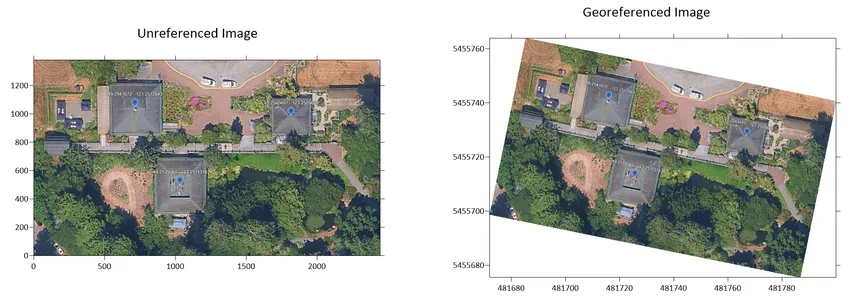
It is a type of coordinate transformation process which assigns real-world geographic coordinates to a digital raster image or vector database. In simpler terms, its like “pinning” a paper map onto a digital globe (Google Earth) or a base map (OpenStreetMap).
The urbz organization has prepared a detailed survey map of the Koliwada region through extensive local mapping and community surveys. This map exists as a PNG image file - a simple picture without any geographic coordinate information.
_(600dpi).png)
Survey Map created by urbz
Think of georeferencing this map as using pushpins to attach a paper map to a bulletin board. Each “pin” is a Ground Control Point (GCP) that connects a feature on the paper map to its real-world location.
Georeferencing example
Once we place enough pins (GCPs), the software can accurately overlay the survey map onto the satellite imagery.
Ground Control Points (GCPs)
These are the precisely surveyed reference points with known geographic coordinates like latitude, longitude and elevation, and are used to improve the geospatial accuracy of the region we are mapping.
GCP Points are VERY IMPORTANT because:
- We cannot map every single point in a region to a geographic coordinate.
- So, known landmarks, buildings, intersections, roads, roundabouts are used as GCP Points to anchor our Raster Image on top of the existing map data.
- More GCPs allow us to be more accurate when we start georeferencing and cause less distortion.
However, measuring and mapping the GCP Points will also invite errors which can be caused due to a number of factors:
- GPS Device Errors:
- Device not calibrated properly
- Wrong EPSG setting
- Poor Satellite visibility
- Human Labelling error
- Misidentifying features (wrong building or intersection)
- Clicking on wrong location in satellite imagery
- Labeling errors in field notes
- Standing at wrong position during GPS logging
- Mapping Errors:
- Surveyed map has drawing inaccuracies
- Map distortion while scanning
- Scale inconsistencies especially in hand-drawn maps
These errors will cause the raster image to stretch and deform to “best fit” on top of the existing map data. Our task is to collect a “large number of reliable, annotated GCPs”. This would keep this deformity to a minimum and making sure that the raster image’s data of a building is not on an intersection.
Waypoints
A waypoint is a reference point used in navigation to define a route or track a position, often specified by geographic coordinates such as latitude and longitude.
Historically, they were defined by their proximity to physical features like mountains, rivers or buildings, but with the advent of modern technology, especially GPS and route tracing, they are defined by precise coordinates.
Waypoints are crucial for this project for:
- Marking GCP locations during field surveys
- Annotating important features along routes
- Creating reference points for future mapping
European Petroleum Survey Group (EPSG) Code System
EPSG (European Petroleum Survey Group) code system is standardized numeric ID assigned to a coordinate reference system (CRS). Each code defines how coordinates (latitude, longitude, altitude, or projected x/y) relate to real locations on Earth.
It varies when mapping different regions of the earth because different regions use different map projections or datums for accuracy. Also, the Earth’s curvature and local geoid distortions change, so the best fitting CRS (and its EPSG code) changes too.
For example: global web mapping systems like OpenStreetMaps and Google Maps use EPSG:3857.
WGS and WGS84
WGS or World Geodetic System is a global datum used by GPS. WGS84 refers to the 1984 revision, which is still the golden standard in digital mapping. It defines:
- The Earth’s shape (reference ellipsoid)
- The origin (center of mass of Earth)
- The coordinate axes orientation
Also, components of WGS84 are identified by codes in the EPSG dataset.
- EPSG:4326
- EPSG:4979
and so on.
GPX File Format
Short for GPS Exchange Format, is an open, lightweight XML-based data format designed for the interchange of GPS data such as waypoints, routes, and tracks.
This format allows for the exchange of:
- Waypoints: Individual points of interest with coordinates
- Routes: Planned paths between waypoints
- Tracks: Recorded paths showing actual movement
- Elevation data: Height in meters above sea level
- Timestamps: Date and time in ISO 8601 format (UTC)
- Metadata: Device info, creator, track names, descriptions
It is also the only format which stores the raw elevation data with precise coordinates and supports GPS-enabled annotations.
GPX is popular in the mapping community because of its universal compatibility with GIS applications,
KML File Format
KML (Keyhole Markup Language) is an XML-based file format used to display geographic data in earth browsers such as Google Earth, Google Maps, and other GIS applications like QGIS.
What KML Stores:
- Geographic coordinates (latitude, longitude)
- Elevation data (height information)
- Visual styling (colors, icons, line widths)
- Descriptions and multimedia (photos, HTML content)
- 3D models and building representations
🌐 Note: The ability of storing photos and 3D models in KML files depends upon the software used to store data as a KML file.
When importing KML files into Google Earth or other 3D viewers, the elevation data behavior depends on the Altitude Mode setting:
- "ClamptoGround" mode: Elevation is ignored; features drape on terrain surface
- "Absolute" mode: Features appear at specified elevation above sea level
Why we use KML:
- Google Earth compatibility: Easy visualization in 3D
- Visual styling: Can apply colors and symbols
- Multimedia support: Can embed photos and descriptions
- Widely recognized: Familiar to non-GIS users
Limitation for Georeferencing: KML may not preserve raw elevation data as precisely as GPX when imported into QGIS, which is why we export both formats.
Necessary Software
Geologgers
With the advancement of technology, along with dedicated high-grade equipment (GoPro with Enabled GPS), smartphone apps are preferred to be used in the dense streets of Koliwada.
Some apps are:
-
GPS Logger (BasicAirData): Free to use, GPS Logging app with built-in EGM96 Correction, on both iOS and Android, supports text annotations (Link)
-
OSMTracker (By OpenStreetMaps): Free to use, GPS Logging app on both iOS and Android, supports text and image annotations (Link)
-
OruxMaps GP: Paid (18 AED), GPS Logging app on both iOS and Android, supports text and image annotations, live 3D Altitude trails (Link)

⭐ GPSTest: Free to use on Android ONLY, GPS Data viewing app with real time satellite status. Supports SBAS and Multi-GLNSS systems.

GPS Test Logo
It is useful for viewing altitude, compass headings, coordinates with given accuracy parameters and supports GPS, GLONASS, GALILEO, SBAS, BEIDOU and QZSS satellites (Including GAGAN for Indian subcontinent).
It is also used for measuring the GPS accuracy and should be referenced before starting any field survey for testing and diagnostics:
- Check if HDOP < 3 for quality data collection
- Verify which satellite systems your phone supports
- Check if GAGAN (India’s SBAS) is working with smartphone
Georeferencing Software
The most suitable Georeferencing software would have to be one which is:
- Free to use
- Able to export data in a format easily used in any software.
That’s why the most suitable software to be used are:
- QGIS (Desktop Version, Long Term Release) (Link)
- Plugins Required
- QuickMapServices (for Google Satellite imagery)
- Installation: Plugins → Manage and Install Plugins → Search “QuickMapServices”
- Georeferencer GDAL (typically pre-installed)
- QuickMapServices (for Google Satellite imagery)
- Plugins Required
- JOSM (Java based OpenStreetMap Editor)
- Can be used for georeferencing with a built-in layer transparency option
- Used for importing and correcting OpenStreetMap data
Data Collection Process (Geologging via GPS Logger)
Setting up the GPS Logger
- On your respective smartphone, turn on “Location Services” and “Notifications” for the app. This will allow the logger to connect to GPS.
- In the top right corner, click the three dots icon “⋮” and go to “Settings”. From make sure that these parameters are set correctly:
- Track Stats: “Based on Total Time”
- System of measurement: “Metric”
- GPS Update Interval: “1 second (for best accuracy)”
- In “Altitude Corrections”, turn “ON” : “EGM96 correction”
- In “Exploration” section, turn “ON” Export tracks in GPX and KML. These are the standard formats in which the traces of the route travelled are stored.
- Change the “KML Altitude Mode” to “Absolute”
Earth Gravitational Model 1996 (EGM96)
It's a mathematical model that describes the geoid - the true "sea level" shape of Earth. So, to measure altitude, two models are widely used:
- WGS84 Ellipsoid (Mathematical Surface)
- Perfect mathematical shape
- Smooth ellipsoid (flattened sphere)
- This is what GPS satellites use for calculations
- It is NOT the same as “Sea Level”
- Geoid (Physical Surface)
- True gravity-based “Sea Level” surface
- Irregular shape (follows gravity variations)
- This model is used when we refer the term “elevation above sea level”
- This is what topographic maps show
*](/user/pages/03.courses/efsi-2025-fall-mumbai/images/image 5.png)
Image from the National Center for Polar and Ice Research
 to research paper.](/user/pages/03.courses/efsi-2025-fall-mumbai/images/image 6.png)
Relation between ellipsoid height (h), orthometric height (H), and geoid undulation (N). Link to research paper.
The EGM96 correction for Koliwada, Dharavi should be around -65 meters. This means that the region of Koliwada is 65 meters BELOW the WGS84 ellipsoid. This is a significant offset.
Practical Example of EGM96: Without Correction
GPS at Dharavi ground level:
GPS measures: 77 meters above WGS84 ellipsoid Displays: 77 meters as altitude
But actual elevation above sea level: ~12 meters This is NOT CORRECT as we are now 65 meters too high.
Practical Example of EGM96: With Correction
GPS measures: 77 meters above WGS84 ellipsoid Applies correction: 77m - 65m = 12m Displays: 12 meters altitude
Actual elevation above sea level: ~12 meters This is CORRECT, as it matches real-world elevation.
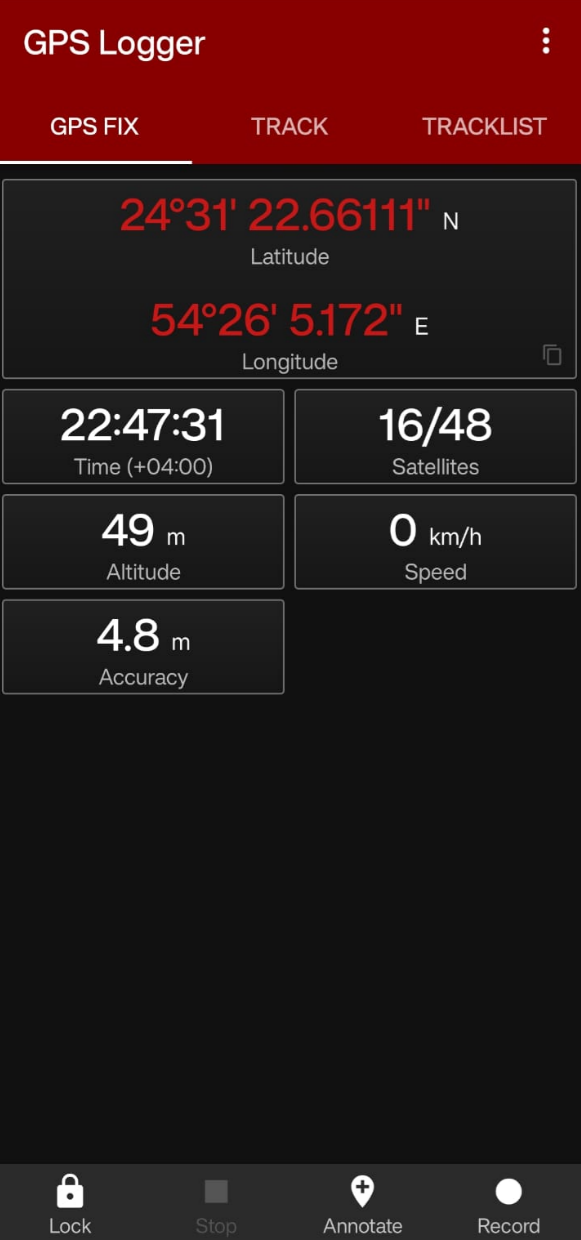
- For this demonstration, BasicAirData GPS Logger is used.
Recording Traces using the GPS Logger
- Before starting the recording, turn on the location and stay in one outdoor spot. It is recommended so that the phone’s GPS can connect and maintain a stable connection with the Navigation satellites (which can be monitored in the “GPS Fix” Section). ONLY start the data collection when GPS Signal is stable.
- To start recording the tracks, navigate to “Track”. This is where the route tracking and GPS-enabled annotating is recorded. Before recording, The screen should look like this:

- Press the Record button to start recording the route. It is recommended to start recording outdoors, and wait until the signal stabilizes.
- To annotate just click the annotate and give it a label to save it. The GPS coordinates of the annotation are stored automatically, which can be reviewed later.
- It is recommended to not pause when standing in the middle of the route. Stopping to record can cause the GPS signal accuracy to decrease when tracking resumes.
- If such a scenario occurs, it is advised to wait patiently until the accuracy increases.
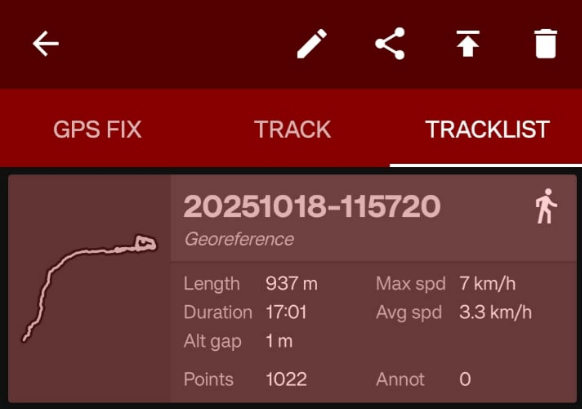
- To access all routes, navigate to “Tracklist”. This tab shows all the previous recorded routes, which can be then exported as a GPX or KML format. Note that all annotations recorded during the route recording are also exported along with these files.
- To export the data, click on the route, and navigate to share button on the top. The data is exported as two separate copies: one in GPX and other in KML format.
Recording Ground Control Points (GCPs)
- Firstly, identify 5-10 locations which can serve as GCP locations. These locations must be well-distributed across the region to be georeferenced. Note that these regions must be safe and accessible.
Note that some GCPs may be rejected. Collect as many GCPs as possible and from an aerial photography viewpoint, choose permanent and distinguishable features like road intersections, roundabouts, important building corners, and other distinct landscape features.
Below are feature-Specific advice on positioning for Optimal GCP Recording.
IMPORTANT BUILDINGS (like Temples, standalone apartment complexes)
- Slightly difficult to use as GCPs as GPS Signal interferes with the building itself.
- Best Practices to record:
- Select corners not surrounded by dense vegetation and with open sky view.
- DO NOT stand directly against the building wall. It is preferred to stand about 3-5 meters away from the building to get better satellite visibility.
- Wait 60-90 seconds for GPS stabilization (longer than usual) before recording it.
- It is advised that after this waiting time, annotating the GCP is also a good practice.
- If the structure has a roof access, one may get better results recording there.
ROAD INTERSECTIONS
- These are challenging to record and use because of traffic safety. It is best that:
- Road intersections are recorded outside rush hours when traffic is minimal.
- High-visibility clothing is worn when recording the road intersections.
- Ask the traffic police, if possible, for helping in recording the GCPs
- To minimize traffic risks these points can be used:
- Painted curbs
- Stop lines, and so on.
- Wait 20-40 seconds for stabilization (shorter duration for minimizing traffic risks)
- Annotating the reference points is the best practice.
ROUNDABOUTS
- These present a unique challenge: a circular geometry means that has no sharp corners. Center of roundabouts offer a good GCP, but are mostly inaccessible or are heavily vegetated.
- It is advised that road lanes which lead upto that roundabout are chosen for potential GCPs.
- If the center of roundabout is an “elevated island”, record points from the edge.
- Best Practice while annotating lane exits in roundabouts:
- Use compass or GPS heading to confirm direction.
- Record the bearing in description: “Roundabout XYZ, north edge (0°), ABC Lane exit”
Warnings when recording Data Traces
- CRITICAL GEOLOGGER SETTING: EGM96 CORRECTION
- Without EGM96 correction, your GPS will report elevation based on the WGS84 ellipsoid (a mathematical model), which is 65 meters different from actual sea level in the Mumbai/Dharavi region.
- It is preferred to record GPS Traces before rush hours in the morning and evening.
- Route recording by geologging apps drain a lot of battery. It is advised to carry a portable power bank if recording routes for extended periods of time.
- Avoid early mornings and late evenings as atmosphere interference with the GPS Signals is high.
- Keep the phone screen ON to prevent ‘GPS Sleep’ mode during the entire Data collection.
- Start recording outdoors where GPS signal is strongest. Do not start the GPS tracing inside buildings.
- Stop at GCPs for:
- Reducing GPS “dancing” (position jumping).
- Better Co-ordinate precision (30-60 seconds of stationary data).
- Averaging the GPS Positions leads to a greater accuracy.
- Monitor the GPS Signal Accuracy when recording GCPs.
- If possible, revisit critical GCPs and record a second time to maintain consistency.
- Hold phone in hand, or in an open packet or backpack strap with its screen ON at all times.
- DO NOT switch to other demanding apps.
- AVOID phone calls during critical sections.
- Monitor accuracy and stability of the GPS Signals either using the GPSTest app or GPS Fix in BasicAirData GPSLogger periodically.
- If stopping for long periods of time, then pausing the track recording is recommended. When turning it on, make sure to wait for the signal to stabilize and then continue recording.
- During recording GPS Tracks, especially in narrow lanes, one might experience “Multipath” error
- MULTIPATH: GPS signals bouncing off buildings, metal structures, or ground before reaching your phone, causing position errors.
- It is noticeable when position oscillates back and forth while stationary, or if accuracy values fluctuate rapidly
- If multipath errors arise, one must stop ASAP, wait for signal to stabilize, move away from reflective surfaces (like buildings, narrow lanes, etc), resume walking when GPS Signal becomes stable
- Make a note of the problematic section
- If one has to pass through narrow lanes, it is recommended that one travels VERY SLOWLY to record tracks.
- Annotations must be done in a meaningful way. A common template used is:
- [Feature Type][Specific Name/Number][Position]_[Cardinal Direction]
- Feature Type: Junction, Temple, Building, Tank, etc.
- Specific Identifier: Road name, building number, landmark name
- Position: Corner, entrance, center, edge, base
- Cardinal Direction: N, S, E, W, NE, NW, SE, SW
- [Feature Type][Specific Name/Number][Position]_[Cardinal Direction]
- It is best to record the same route multiple times, because:
- Averages out GPS errors
- Captures features missed in first pass
- Confirms accuracy of first track
A good strategy
PASS 1 (Exploratory):
- Walk route, get familiar with area
- Annotate obvious GCP candidates
- Note problematic areas
PASS 2 (Detailed):
- Focus on GCP marking
- Stop longer at key points (60+ seconds)
- Add detailed annotations
PASS 3 (Verification):
- Walk in opposite direction if possible
- Different time of day = different satellite geometry
- Verify accuracy of previous passes

حقوق الطبع والنشر © 2026 المؤلفين الأصلي. كل الحقوق محفوظة.